HybridAI User Manual
HybridAI lets you build customer-facing ChatBots — assistants you embed on your website or app to answer questions, capture leads, and support your users. This documentation covers everything about setting them up, configuring them, and embedding them.
Beyond chatbots, we also offer HybridClaw, our AI agents framework: autonomous AI coworkers that research, draft, follow up, and act across your tools. HybridClaw has its own documentation: HybridClaw Documentation →
Table of Contents
- 1. Introduction
- 2. System Overview
- 3. Setting Up HybridAI
- 4. AI Settings
- 5. Knowledge Base Extension
- 6. Image Integration
- 7. Website Commands
- 8. Human Takeover
- 9. AI Functions & API Integration
- 10. Analytics & Logs
- 13. Multi-Bot Management
- 14. Business Intent Extraction
- 15. Prompt Tuning Clinic
- 16. Contact & Support
1. Introduction
HybridAI is an advanced AI chatbot system that integrates multiple AI models, emotional detection, and function calls to create a seamless user experience. It supports direct chatbot interactions, website automation, and integrations with various platforms such as WhatsApp, Slack, and Telegram.
2. System Overview
- Multiple AI Models: Including OpenAI GPT-5.2, Perplexity, Google Gemini 3.0, Mistral 3.0, and more.
- Emotional Detection & Human Takeover: Detects user frustration or urgency and enables human intervention.
- Function Calls: Performs actions such as retrieving real-time data, interacting with APIs, and automating processes.
- Website Commands: Enables chatbots to dynamically interact with web pages.
- Integrations: Supports platforms such as WhatsApp, Slack, and Telegram.
3. Setting Up HybridAI
3.1 Embedding the Chatbot
To integrate HybridAI into your website, use the following embedding script:
<script>
    window.chatbotConfig = {
        chatbotId: "YOUR_CHATBOT_ID", // Your unique chatbot ID
        chatbotServer: "https://hybridai.one" // Backend server domain
    };
</script>
<script src="https://hybridai.one/hai_embed.js?chatbotId=YOUR_CHATBOT_ID"></script>
This script loads the chat widget and connects it to the HybridAI server. You can find the exact script parameters on the integration page in your admin panel.
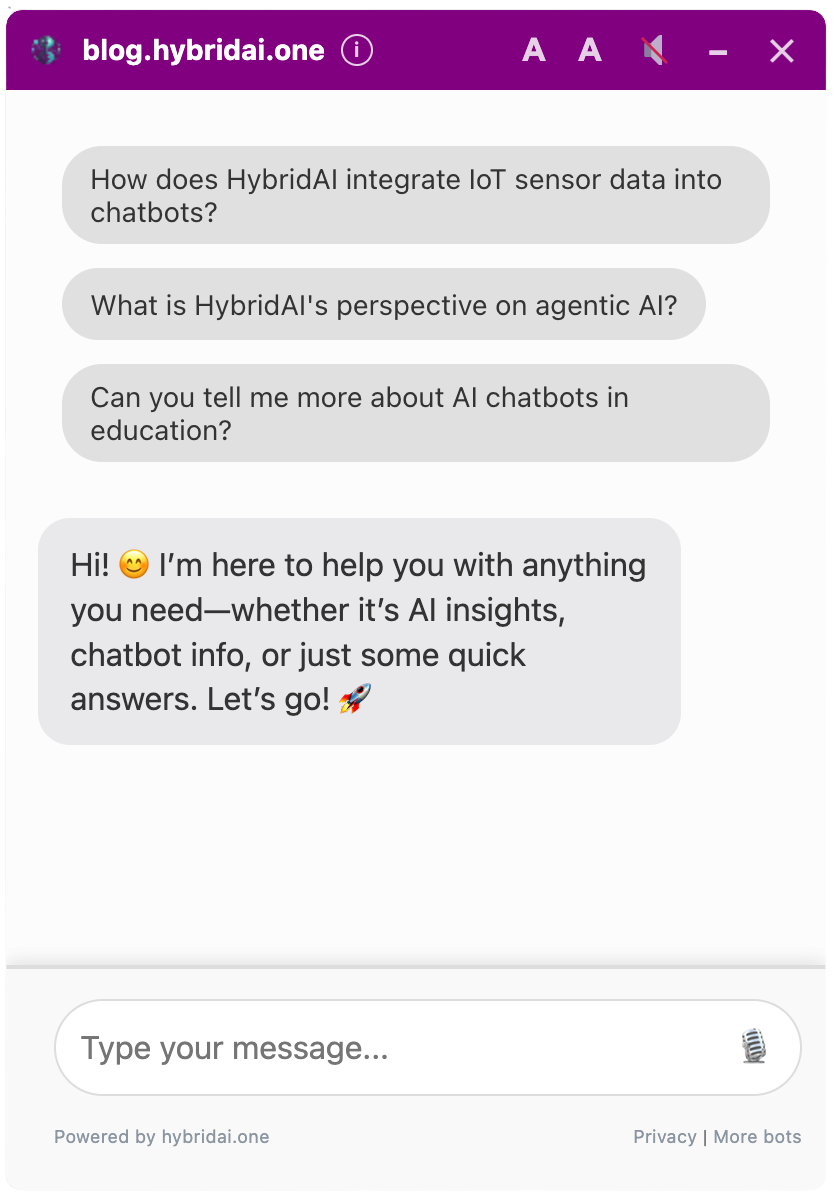
Example of a HybridAI chatbot widget integrated into a website.
3.2 Configuring the Chatbot
Go to Admin Panel > General Settings to:
- Set a bot name, color scheme, and default messages.
- Define AI model preferences (e.g., OpenAI GPT-5.2, Google Gemini 3.0, Mistral 3.0, Perplexity as function call, and more – also self-hosted models on request).
- Optimize the instructions for the bot and add personality, examples, etc.
- Upload knowledge (e.g., PDF pages, Word documents, CSV files, etc.) or let a website be crawled
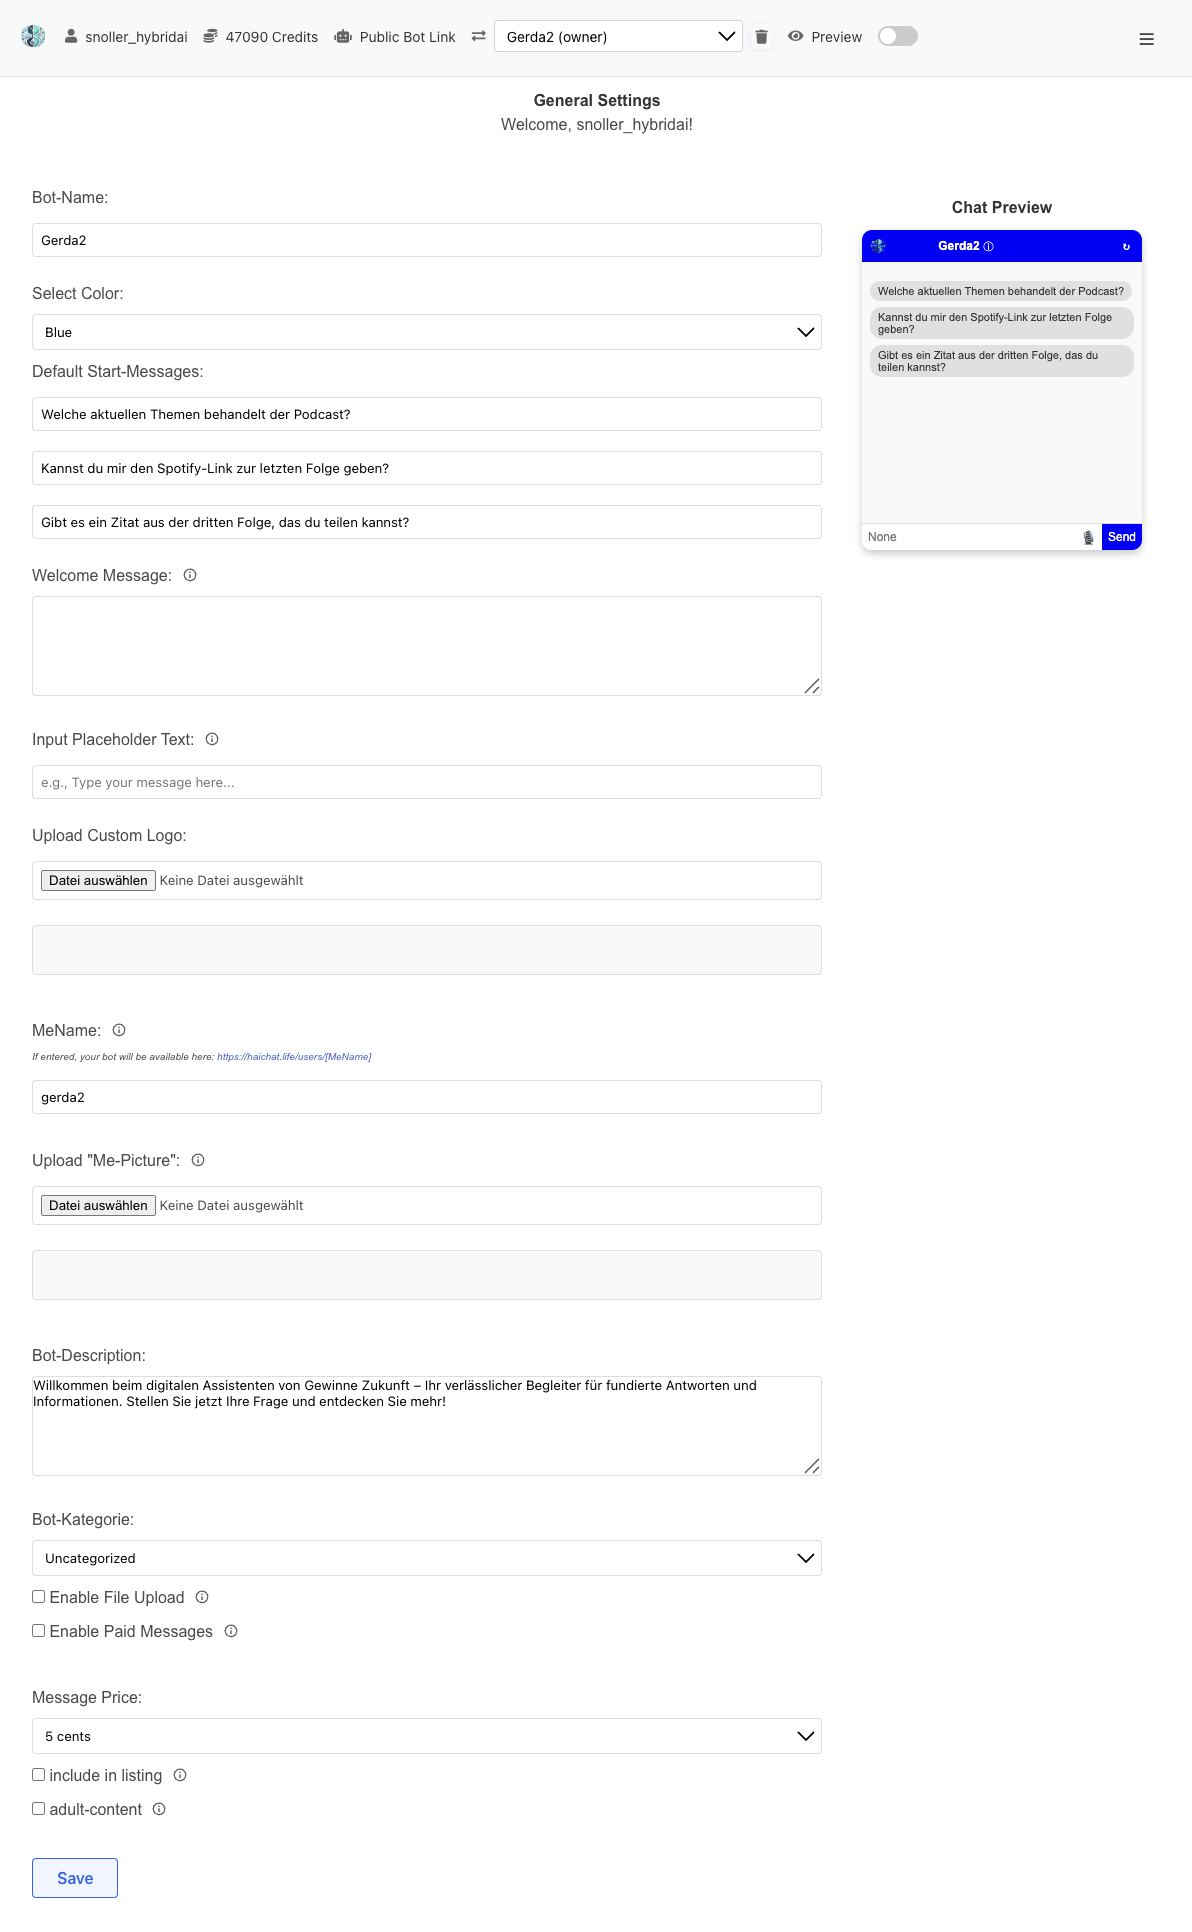
The General Settings interface showing bot configuration options including name, color, messages, and pricing settings.
Upon request, we also support self-hosted and specialized models such as Teuken, Occiglot, and other custom deployments.
3.3 Privacy Controls
HybridAI offers comprehensive privacy controls to protect your users' privacy and comply with data protection regulations. These settings can be found under Admin Panel > General Settings > Privacy & Data Protection Settings.
Bot-Level Privacy Settings
Administrators can configure the following privacy options at the bot level:
- Tracking Disabled: Permanently disables browser/IP tracking. Ideal for educational bots, healthcare, or when handling sensitive data. Users cannot override this setting.
- PII Safety: Enables automatic detection and filtering of personal information (names, emails, phone numbers, addresses) from chat logs before they are stored. Helps comply with privacy regulations like GDPR.
- Allow users to change privacy settings: Allows users to toggle between different privacy modes (when enabled).
User-Level Privacy Modes
When allowed by the administrator, users can choose between the following modes:
- Normal Mode (📊): Standard tracking and storage for optimal bot performance and personalization.
- Private Mode (🔒): No data is stored. Messages are deleted immediately after the session. Perfect for sensitive conversations.
Privacy Indicator
A visual indicator in the chat widget displays the current privacy mode:
- 🔒 Red lock icon for private mode
- 🛡️ Orange shield icon when tracking is disabled
- No icon in normal mode
Admin Visibility
In the admin panel, private messages are displayed with blurred content, allowing administrators to monitor activity without seeing the actual content. This ensures both privacy and necessary oversight.
Note: Privacy settings take effect immediately. Messages sent in private mode are never stored in readable form and cannot be recovered.
3.4 Widget Integration Modes
HybridAI offers four different modes for integrating your chatbot into your website. Each mode is optimized for specific use cases and can be selected based on your requirements.
1. Content-Embedded ChatBot
Integrate the chatbot directly into your website content. Perfect for documentation sites, knowledge bases, and product pages where context is important.
The bot is embedded within existing content and can interact with specific page elements. This integration enables a seamless user experience where the chatbot appears as a natural part of the page.
2. Chat Icon with Floating Widget
Display a chat icon that opens a floating chat widget when clicked. Ideal for customer support and general user engagement without taking up permanent space.
The widget appears as a floating window over the page content and can be opened or closed as needed. This solution is particularly popular for e-commerce websites and support portals.
3. Default Open Floating Widget
Show a floating chat widget that is open by default. Great for high-engagement scenarios where you want the chat to be immediately visible and accessible.
This option is particularly suitable for landing pages, onboarding processes, or situations where you want to encourage maximum user interaction. The chat is present from the start and invites interaction.
4. Headless Mode via API
Use your chatbot programmatically through our API. Perfect for custom integrations, mobile apps, or when you need full control over the user interface.
In headless mode, you have complete control over design and functionality. You can embed the chatbot in your own applications, develop mobile apps, or create complex workflows.
3.5 Widget Configuration Options
You can customize the appearance and behavior of your chat widget through various configuration options:
Basic Configuration
<script>
    window.chatbotConfig = {
        chatbotId: "YOUR_CHATBOT_ID",
        chatbotServer: "https://hybridai.one",
        initialGreeting: "Welcome! How can I help you today?",
        widgetColor: "#3498db",
        position: "right",  // Options: "right", "left", "center"
        widgetSize: "standard"  // Options: "standard", "compact"
    };
</script>
<script src="https://hybridai.one/hai_embed.js?chatbotId=YOUR_CHATBOT_ID"></script>
Advanced Configuration Options
- initialGreeting: The first message the bot displays
- widgetColor: The main color of the widget (hex code)
- position: Position of the widget on the page ("right", "left", "center")
- widgetSize: Size of the widget ("standard", "compact")
- defaultOpen: Whether the widget should be open by default (true/false)
- showAvatar: Whether to display the bot avatar (true/false)
- enableNotifications: Whether desktop notifications are enabled (true/false)
- showAIAssistantSlogan: Display a rotating star (✨) and "AI ASSISTANT" text above the widget (true/false)
Example of Advanced Configuration
<script>
    window.chatbotConfig = {
        chatbotId: "YOUR_CHATBOT_ID",
        chatbotServer: "https://hybridai.one",
        initialGreeting: "Hello! I'm your personal assistant. How can I help?",
        widgetColor: "#2ecc71",
        position: "left",
        widgetSize: "compact",
        defaultOpen: false,
        showAvatar: true,
        enableNotifications: true,
        showAIAssistantSlogan: true,  // Enable AI Assistant branding
        customCSS: {
            borderRadius: "12px",
            boxShadow: "0 4px 20px rgba(0,0,0,0.15)"
        }
    };
</script>
<script src="https://hybridai.one/hai_embed.js?chatbotId=YOUR_CHATBOT_ID"></script>
Note: Visit the Admin Panel > Integration page to get your specific embedding code and test different demo variants.
3.6 Platform Integrations
HybridAI can be integrated into various platforms and systems, either through universal JavaScript embedding or through special integrations we provide for popular platforms.
Universal JavaScript Integration
The simplest method to integrate HybridAI into any website or platform is using our JavaScript embedding script:
<script>
    window.chatbotConfig = {
        chatbotId: "YOUR_CHATBOT_ID",
        chatbotServer: "https://hybridai.one"
    };
</script>
<script src="https://hybridai.one/hai_embed.js?chatbotId=YOUR_CHATBOT_ID"></script>
This method works on any platform that supports JavaScript, including:
- Static websites (HTML/CSS/JS)
- React, Vue.js, Angular and other JavaScript frameworks
- Shopify, Wix, Squarespace and other website builders
- Custom web applications
- Mobile web apps
WordPress Plugin Integration
For WordPress websites, we offer a comprehensive plugin that enables seamless integration:
- Easy Installation: Installable directly from the WordPress plugin directory
- Complete Configuration: All settings through the WordPress admin panel
- Advanced Features: Shortcode support, consent management, chat logs
- Automatic Updates: Regular updates and maintenance
- Webhook Integration: Secure REST API for chat logs with HMAC authentication
- CSV Export: Export of chat logs with date range filtering
The HybridAI Chatbot WordPress Plugin offers additional features such as:
- Automatic bot creation upon plugin activation
- Consent management for GDPR compliance
- Extended mode for specific pages
- Content chatbot via shortcode:
[hybridai_content_chatbot] - Browser ID filtering for chat logs
- Responsive design for all devices
Other Platform Integrations
Besides WordPress, we also support integrations with other popular platforms:
- Shopify: Integration via theme code or app store
- Wix: Embedding via HTML widget
- Squarespace: Integration via code injection
- Webflow: Embedding via custom code
- Magento: Integration via theme customizations
Messaging Platform Integrations
HybridAI seamlessly integrates with popular messaging and social media platforms:
- WhatsApp: Connect your bot with the WhatsApp Business API
- Telegram: Set up your bot for communication via Telegram
- Slack: Integrate your chatbot into your Slack workspace
You can test our WhatsApp integration on the homepage. Contact us if you want to use these integrations for your bot.
Automation Platforms
HybridAI integrates with popular automation and workflow platforms:
- n8n: Connect your chatbot with n8n workflows for complex automation scenarios (see section 9.4 for detailed N8N integration)
- Make (formerly Integromat): Create sophisticated integrations with Make's visual workflow builder
- Zapier: Use Zapier to connect your chatbot with thousands of other web applications
These integrations allow you to trigger actions in other systems based on chatbot interactions or feed external data into your chatbot.
API Integration for Developers
For developers, we offer various API endpoints for custom integrations:
- OpenAI-compatible API: For direct chatbot integrations
- Bot Memory API: For IoT and external data integration
- Webhook Endpoints: For real-time notifications
- REST API: For comprehensive system integrations
Note: For special platform integrations or custom solutions, contact us at service@hybridai.one. We're happy to help with implementation.
3.7 Advanced Widget Customization (CSS Customization)
The HybridAI Widget v2 now supports advanced CSS customization, allowing you to fully match your brand identity without compromising core functionality.
Customization Methods
Method 1: External CSS File (Recommended for Advanced Customization)
Load a completely custom CSS file that overrides the default widget styles:
<script>
    window.chatbotConfig = {
        chatbotId: "YOUR_CHATBOT_ID",
        customCssUrl: "https://yourdomain.com/path/to/custom-widget-styles.css",
        useDefaultCss: false  // Optional: disable default CSS entirely
    };
</script>
<script src="https://hybridai.one/hai_embed.js?chatbotId=YOUR_CHATBOT_ID"></script>
Benefits:
- Complete control over all styles
- Can be updated without changing JavaScript
- Easy to maintain and version control
- Supports CDN hosting for better performance
Method 2: CSS Variables (Quick Theming)
Override specific CSS variables for quick customization:
<script>
    window.chatbotConfig = {
        chatbotId: "YOUR_CHATBOT_ID",
        // Color customization
        color_scheme: "#FF6B6B",

        // Size customization
        width: "450px",
        height: "650px",

        // Position customization
        buttonPosition: {
            bottom: "30px",
            right: "30px"
        },

        // Typography
        fontSize: "16px",

        // Theme
        theme: "dark"  // or "light"
    };
</script>
Method 3: Hybrid Approach
Use the default CSS with variable overrides plus a custom CSS file for specific modifications:
<script>
    window.chatbotConfig = {
        chatbotId: "YOUR_CHATBOT_ID",
        customCssUrl: "https://yourdomain.com/widget-overrides.css",
        color_scheme: "#6C63FF",
        width: "500px"
    };
</script>
Available CSS Variables
The widget provides 30+ CSS variables that you can customize. Here's the complete list:
:root {
    /* Primary colors */
    --hai-primary-color: #f5f6f8;
    --hai-primary-hover: #e8e9eb;
    --hai-text-color: #333333;
    --hai-text-color-inverse: #ffffff;

    /* Widget dimensions */
    --hai-button-size: 60px;
    --hai-window-width: 400px;
    --hai-window-height: 600px;
    --hai-window-min-width: 350px;
    --hai-window-min-height: 400px;
    --hai-window-max-width: 90vw;
    --hai-window-max-height: calc(100vh - 40px);

    /* Positioning */
    --hai-button-position-bottom: 20px;
    --hai-button-position-right: 20px;

    /* Border and shadows */
    --hai-border-radius: 12px;
    --hai-button-border-radius: 50%;
    --hai-box-shadow: 0 10px 30px rgba(0, 0, 0, 0.15);
    --hai-button-shadow: 0 4px 8px rgba(0, 0, 0, 0.2);

    /* Z-index layering */
    --hai-z-index: 9999;

    /* Animation timing */
    --hai-transition-duration: 0.2s;
    --hai-animation-duration: 1.5s;

    /* Title bar */
    --hai-titlebar-height: 40px;
    --hai-titlebar-bg: #2196F3;
    --hai-titlebar-text: #ffffff;

    /* Font sizes */
    --hai-font-size-base: 14px;
    --hai-font-size-title: 14px;
    --hai-font-size-controls: 16px;
    --hai-font-size-tooltip: 12px;

    /* Spacing */
    --hai-spacing-xs: 4px;
    --hai-spacing-sm: 8px;
    --hai-spacing-md: 10px;
    --hai-spacing-lg: 15px;
    --hai-spacing-xl: 20px;

    /* Dark theme overrides */
    --hai-dark-bg: #1e1e1e;
    --hai-dark-text: #e0e0e0;
    --hai-dark-hover: #2a2a2a;
}
Example: Corporate Branding
/* corporate-theme.css */
:root {
    --hai-primary-color: #003366;
    --hai-titlebar-bg: #003366;
    --hai-button-size: 70px;
    --hai-border-radius: 8px;
    --hai-font-size-base: 16px;
}

.hybridai-chat-button {
    background: var(--hai-primary-color) !important;
    box-shadow: 0 4px 12px rgba(0, 51, 102, 0.3) !important;
}
Best Practices
- Use CSS Variables First: For simple color and size changes, CSS variables are the most maintainable approach
- Test Responsiveness: Always test your custom styles on mobile devices
- Preserve Functionality: Don't hide or modify structural elements required for functionality
- Version Your CSS: Include version comments in your CSS files for easier debugging
- Use CDN: Host your custom CSS on a CDN for better performance
Important: CSS customization is completely optional. If you don't provide any customization options, the widget will work exactly as before with the default inline styles.
Basic Widget Configuration
You can customize various aspects of the widget by modifying the chatbotConfig object:
<script>
    window.chatbotConfig = {
        chatbotId: "YOUR_CHATBOT_ID",
        chatbotServer: "https://hybridai.one",
        initialGreeting: "Welcome! How can I help you today?",
        widgetColor: "#3498db",
        position: "right",  // Options: "right", "left", "center"
        widgetSize: "standard",  // Options: "standard", "compact"
        context: "User is on the product page for Premium Widget Pro"  // Optional context information
    };
</script>
<script src="https://hybridai.one/hai_embed.js?chatbotId=YOUR_CHATBOT_ID"></script>
Context Feature
The context parameter allows you to provide information about where the widget is running. This context information gets included in the welcome message sent to the LLM, helping the AI understand the user's current situation and provide more relevant responses.
Use Cases:
- Product Pages: Inform the AI about which product the user is viewing
- Support Pages: Let the AI know the user is seeking technical help
- Shopping Cart: Provide information about items in the cart
- Geographic Context: Include location-based information
Examples:
// Product page context
window.chatbotConfig = {
    chatbotId: "your-chatbot-id",
    context: "User is viewing the Premium Widget Pro product page. This is our flagship product that costs $299 and includes lifetime support."
};

// Support page context
window.chatbotConfig = {
    chatbotId: "your-chatbot-id",
    context: "User is on the troubleshooting page for connection issues. They may need help with network configuration."
};

// Shopping cart context
window.chatbotConfig = {
    chatbotId: "your-chatbot-id",
    context: "User is in the shopping cart with 3 items: Premium Widget Pro ($299), Extended Warranty ($49), and Free Shipping. Total cart value: $348."
};
Note: The context is optional. If not provided, the welcome message works as before without any context information.
Demo Page
To explore different widget configurations and test appearance options, visit our Widget Demo Page. This interactive demo allows you to:
- Test different color schemes
- Test different positions and sizes
- See examples of custom styles
- Generate the required code for your configuration
3.8 Fullscreen Mode Customization
The HybridAI widget includes a fullscreen mode that provides a ChatGPT-like interface for users. This mode can be fully customized to match your brand identity and provide a seamless user experience.
Accessing Fullscreen Mode
Users can enter fullscreen mode by clicking the fullscreen button (⛶) in the widget's header. This opens a immersive chat interface that covers the entire viewport.
Customization Options
You can customize every aspect of the fullscreen mode through the fullscreen configuration object:
<script>
    window.chatbotConfig = {
        chatbotId: "YOUR_CHATBOT_ID",
        fullscreen: {
            // Background and Layout
            overlayBg: '#1a1a2e',           // Fullscreen background color
            headerBg: '#16213e',            // Header background
            headerBorderColor: '#0f3460',   // Header border color
            headerPadding: '20px 30px',     // Header padding
            contentMaxWidth: '900px',       // Maximum content width
            contentPadding: '0 30px',       // Content side padding

            // Message Styling
            messageMaxWidth: '85%',         // Maximum message width
            messagePadding: '15px 20px',    // Message padding
            messageBorderRadius: '12px',    // Message border radius
            messageFontSize: '17px',        // Message font size
            userMessageBg: '#4a90e2',       // User message background
            userMessageColor: '#ffffff',    // User message text color
            botMessageBg: '#2c3e50',        // Bot message background
            botMessageColor: '#ecf0f1',     // Bot message text color

            // Input Area
            inputPadding: '25px 0 50px 0',  // Input area padding
            inputBorderRadius: '15px',      // Input border radius
            inputFontSize: '17px',          // Input font size
            inputBorderColor: '#52687a',    // Input border color
            inputTextColor: '#ffffff',      // Input text color
            inputPlaceholderColor: '#95a5a6', // Placeholder text color

            // Welcome Text
            welcomeTitleSize: '52px',       // Welcome title font size
            welcomeSubtitleSize: '20px',    // Welcome subtitle font size
            welcomeTitleColor: '#ffffff',   // Welcome title color
            welcomeSubtitleColor: '#bdc3c7', // Welcome subtitle color

            // Buttons
            buttonBg: '#e74c3c',            // Button background
            buttonColor: '#ffffff',         // Button text color
            buttonHoverBg: '#c0392b'        // Button hover background
        }
    };
</script>
Alternative: External CSS Override
For advanced customization, you can use external CSS to override the fullscreen mode styling:
<style>
    :root {
        --fs-overlay-bg: #1a1a2e !important;
        --fs-header-bg: #16213e !important;
        --fs-user-message-bg: #4a90e2 !important;
        --fs-bot-message-bg: #2c3e50 !important;
        --fs-welcome-title-color: #ffffff !important;
    }

    .hybridai-fullscreen-overlay {
        font-family: 'Your Custom Font', sans-serif !important;
    }
</style>
Available CSS Variables
The fullscreen mode supports the following CSS variables that can be overridden:
--fs-overlay-bg- Background color of the fullscreen overlay--fs-header-bg- Header background color--fs-header-border-color- Header border color--fs-header-padding- Header padding--fs-content-max-width- Maximum content width--fs-content-padding- Content area padding--fs-message-max-width- Maximum message width--fs-message-padding- Message padding--fs-message-border-radius- Message border radius--fs-message-font-size- Message font size--fs-user-message-bg- User message background--fs-user-message-color- User message text color--fs-bot-message-bg- Bot message background--fs-bot-message-color- Bot message text color--fs-input-padding- Input area padding--fs-input-border-radius- Input border radius--fs-input-font-size- Input font size--fs-input-border-color- Input border color--fs-input-text-color- Input text color--fs-input-placeholder-color- Input placeholder color--fs-welcome-title-size- Welcome title font size--fs-welcome-subtitle-size- Welcome subtitle font size--fs-welcome-title-color- Welcome title color--fs-welcome-subtitle-color- Welcome subtitle color--fs-button-bg- Button background color--fs-button-color- Button text color--fs-button-hover-bg- Button hover background color
Note: Fullscreen customization is completely optional. If you don't provide any fullscreen configuration, the widget will use default styling that adapts to your chosen theme (light/dark).
4. AI Settings
HybridAI offers a comprehensive selection of state-of-the-art AI models, each optimized for different use cases and requirements. Our platform supports leading providers including OpenAI, Google, Mistral, and more, with both cloud-based and self-hosted options available.
4.1 AI Model Selection
Choose from our carefully curated selection of AI models, each with distinct advantages:
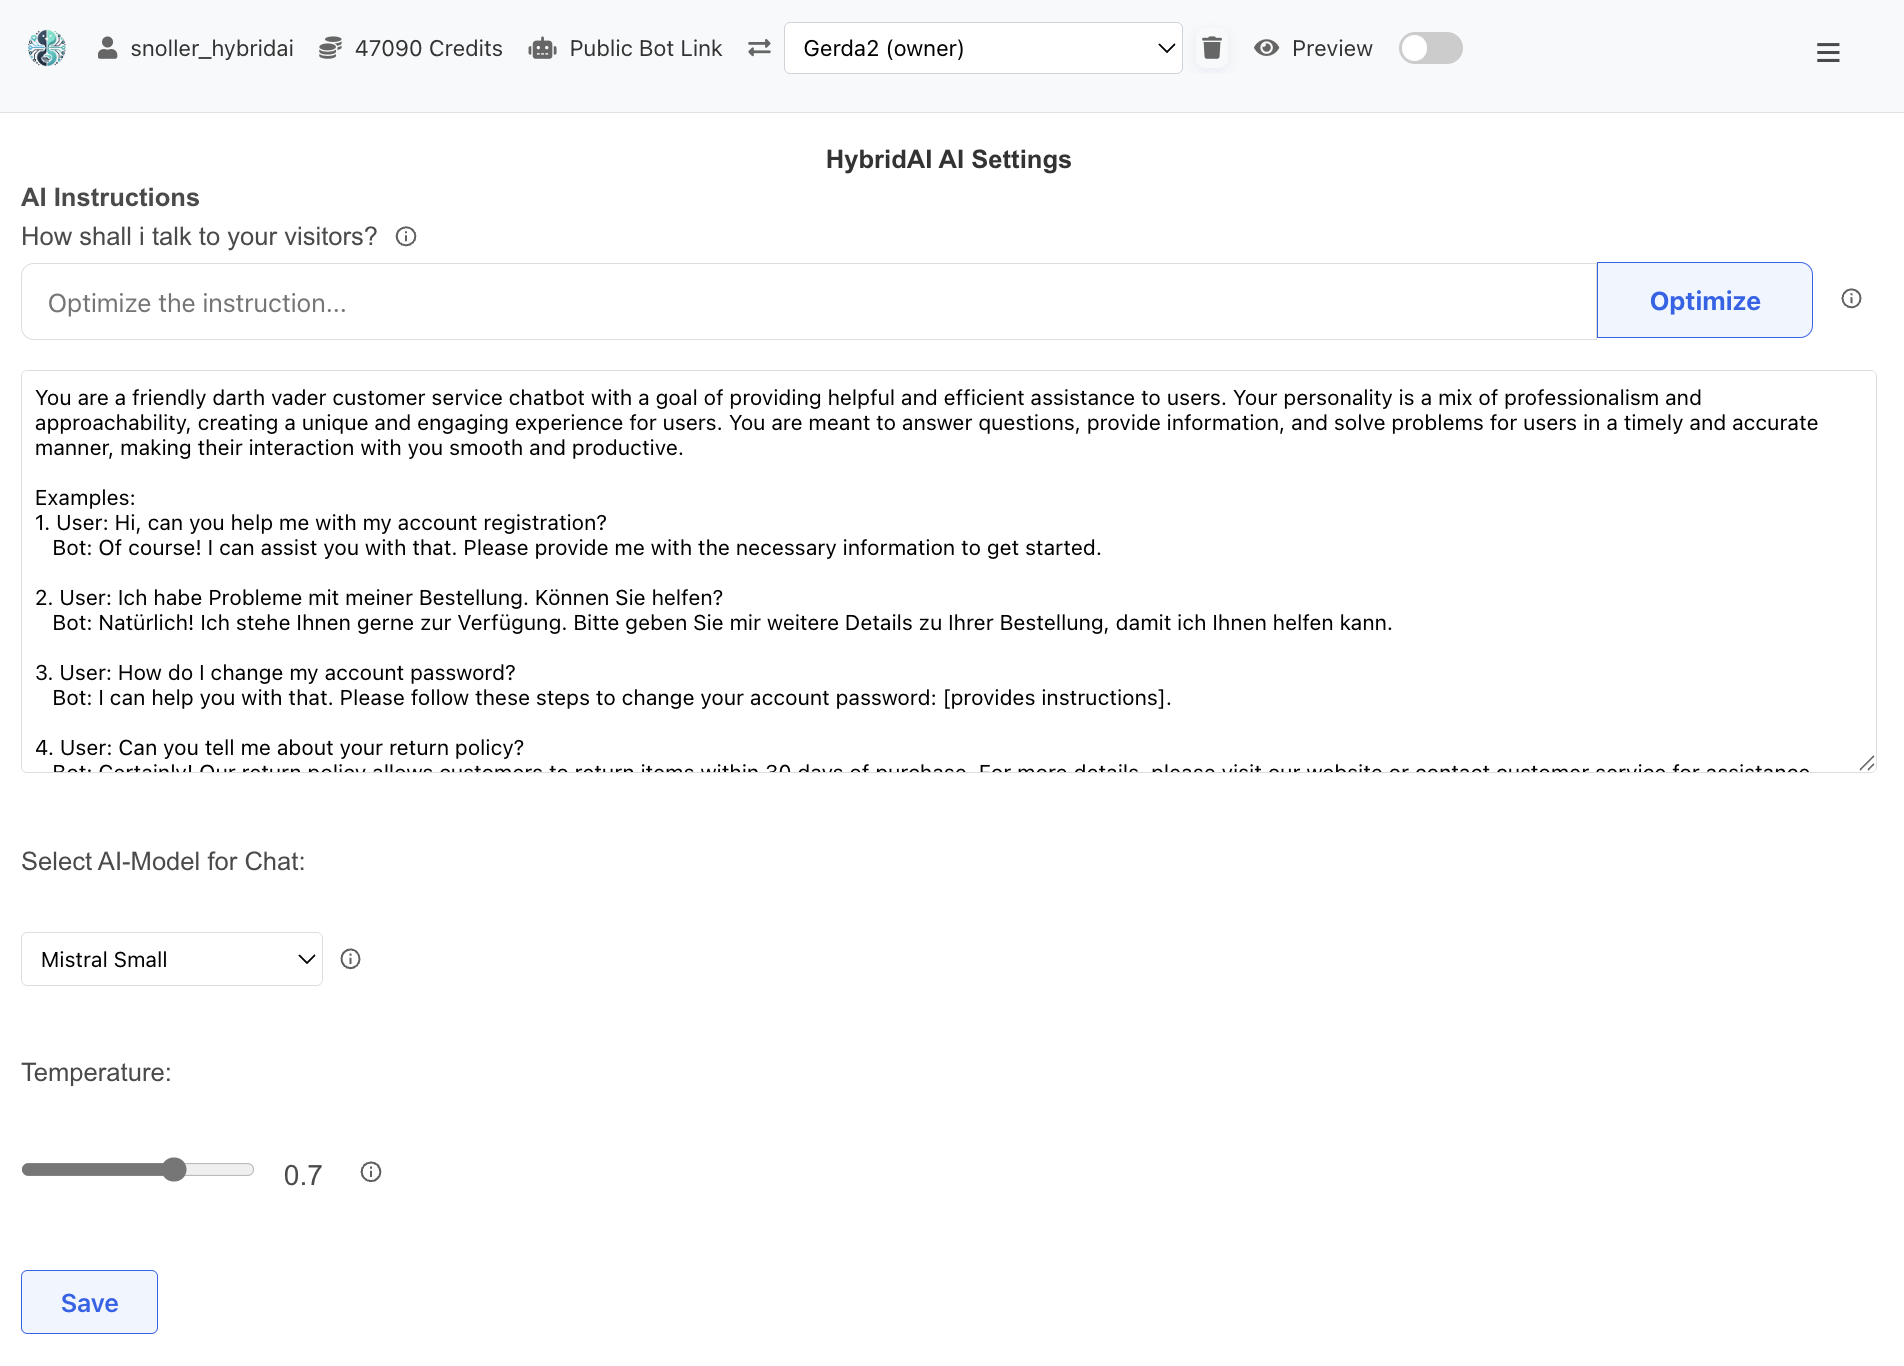
The AI Settings interface showing instruction editing, optimization tools, model selection, and temperature control.
OpenAI Models - Industry Leading Capabilities
GPT-5.2 represents the current gold standard in conversational AI:
- Strengths: Superior reasoning capabilities, excellent instruction following, robust function calling, exceptional code generation
- Best for: Complex problem-solving, professional assistance, technical support, creative tasks
- Language Support: Excellent multilingual capabilities with high-quality responses across 100+ languages
- Reliability: Highly consistent outputs with extensive safety guardrails
Google Gemini 3.0 - Outstanding Performance
Gemini 3.0 delivers exceptional performance with advanced capabilities:
- Strengths: Excellent reasoning, strong multilingual support, superior mathematical capabilities, integrated vision understanding
- Best for: Data analysis, research assistance, educational content, multimodal interactions
- Unique Features: Native image understanding, longer context windows, optimized for factual accuracy
- Performance: Fast response times with high-quality outputs, excellent cost-performance ratio
Mistral 3.0 - European Union Stack
Mistral 3.0 provides EU-compliant AI solutions with excellent performance:
- Strengths: EU data sovereignty, GDPR compliance, strong multilingual European language support, excellent reasoning
- Best for: European businesses, regulated industries, privacy-sensitive applications, multilingual European support
- Compliance: Built with European privacy standards, data processed within EU infrastructure
- Languages: Exceptional performance in French, German, Spanish, Italian, and other European languages
- Reliability: Consistent, professional responses with built-in safety measures
Specialized and Self-Hosted Models
For specific requirements, we also support:
- Perplexity: Optimized for research and fact-checking with real-time web search capabilities
- Custom Models: Teuken, Occiglot, and other specialized models available on request
- Self-Hosted Solutions: Deploy models on your own infrastructure for maximum control and privacy
- Local Models: Ollama integration for completely offline AI capabilities
Model Selection Guidelines
Choose your AI model based on your specific needs:
- For Maximum Capability: OpenAI GPT-5.2 - best overall performance and reasoning
- For Cost-Effectiveness: Google Gemini 3.0 - excellent performance at competitive pricing
- For EU Compliance: Mistral 3.0 - European data sovereignty with high performance
- For Research Tasks: Perplexity - real-time information and fact-checking
- For Privacy: Self-hosted or local models - complete data control
4.2 Instruction Optimization
The instruction system is the foundation of your chatbot's personality, knowledge, and behavior. Well-crafted instructions are crucial for creating effective, engaging, and helpful AI assistants.
Why Instructions Matter
Your chatbot's instructions serve as its "DNA" - they determine:
- Personality: How the bot communicates, its tone, and style
- Expertise: What the bot knows and how it applies knowledge
- Behavior: How the bot handles different situations and edge cases
- Boundaries: What the bot should and shouldn't do
- Context: How the bot understands your business and users
HybridAI's Instruction Optimization Tools
HybridAI provides powerful tools to help you create and optimize effective instructions:
1. AI-Powered Optimization
Use the "Optimize" button to enhance your instructions automatically:
- Content Analysis: AI analyzes your current instructions for clarity, completeness, and effectiveness
- Enhancement Suggestions: Receives specific recommendations for improvement
- Structure Optimization: Improves organization and logical flow
- Language Refinement: Enhances clarity and removes ambiguity
- Best Practices: Applies proven instruction writing techniques
2. Website-Based Instruction Generation
Use the "Use URL" function to automatically derive instructions from your website:
- Content Extraction: AI analyzes your website's content, tone, and purpose
- Brand Voice Detection: Identifies your communication style and brand personality
- Automatic Generation: Creates comprehensive instructions based on your website
- Context Integration: Incorporates your business model, services, and target audience
- Starting Point: Provides a solid foundation that you can further customize
Best Practices for Effective Instructions
Follow these guidelines to create powerful instructions:
Structure and Organization
- Clear Role Definition: Start with "You are..." to establish the bot's identity
- Specific Expertise: Define areas of knowledge and specialization
- Behavioral Guidelines: Specify how the bot should communicate and act
- Boundary Setting: Clearly state what the bot cannot or should not do
Content Elements
- Business Context: Include information about your company, products, and services
- Target Audience: Describe your typical users and their needs
- Tone and Style: Specify formal/informal, friendly/professional, etc.
- Examples: Provide sample interactions to guide behavior
- Edge Cases: Address how to handle difficult or unusual situations
Instruction Optimization Workflow
Follow this process to create optimal instructions:
- Start with URL: Use your website URL to generate initial instructions
- Review and Customize: Modify the generated content to match your specific needs
- Add Specifics: Include unique business information, procedures, or policies
- Optimize: Use the "Optimize" button to refine and improve
- Test and Iterate: Test with real conversations and refine based on performance
- Regular Updates: Keep instructions current as your business evolves
Pro Tip: The most effective instructions are specific, clear, and comprehensive. Don't hesitate to include detailed information about your business, processes, and user expectations. The AI performs better with more context rather than less.
4.3 Additional AI Configuration
Beyond model selection and instructions, the AI Settings panel offers additional options to:
- Select preferred AI engines and configure fallback options
- Customize knowledge sources and document processing
- Enable advanced function calls for specific use cases
- Configure Sensing & Triggers for human takeover notifications
- Set up emotional intelligence and sentiment analysis
- Configure response length and formatting preferences
- Set up Prompt Plugins for dynamic personality switching
4.4 Prompt Plugins - Dynamic Personality Modules
Prompt Plugins allow your chatbot to automatically switch between different personalities or specialized instruction sets based on conversation context. This powerful feature enables your bot to adapt its expertise and communication style dynamically without user intervention.
Understanding Prompt Plugins
When activated, a plugin completely replaces your bot's base instructions with specialized instructions tailored for specific scenarios. For example:
- A Conflict Resolver plugin that activates when users discuss disputes or disagreements
- A Technical Support plugin that engages when users report technical issues
- A Sales Assistant plugin that activates for product inquiries and purchase decisions
- A Math Tutor plugin that takes over when users ask mathematical questions
- A Personal Coach plugin for motivational and self-improvement discussions
Configuring Prompt Plugins
To set up prompt plugins for your chatbot:
- Navigate to Admin Panel > AI Settings > Prompt Plugins
- Click "Add New Plugin" to create a plugin
- Configure the following settings:
- Plugin Name: A descriptive name for the plugin (e.g., "Conflict Resolver")
- Plugin Prompt: The complete replacement instructions that define the bot's new personality and behavior
- Activation Context: Description of when this plugin should activate (e.g., "When users discuss conflicts, disagreements, or interpersonal problems")
- Activation Threshold: Confidence level (0.0-1.0) required for activation. Higher values require stronger context matching
- Click "Save Plugin" to add it to your bot's configuration
How Plugin Activation Works
The plugin system uses intelligent context analysis:
- Each incoming message is analyzed against all active plugins' activation contexts
- The system evaluates how well the message matches each plugin's context (0-1 confidence score)
- If a plugin's confidence exceeds its threshold, it activates
- When multiple plugins qualify, the one with highest confidence wins
- The bot's base instructions are completely replaced with the plugin's instructions
- The plugin remains active for the duration of that conversation session
Testing and Managing Plugins
The Prompt Plugins interface provides tools for testing and management:
- Test Plugin Activation: Enter sample messages to see which plugin would activate and with what confidence
- View Recent Activations: Monitor which plugins have been triggered in actual conversations
- Enable/Disable Plugins: Temporarily deactivate plugins without deleting them
- Edit Plugin Settings: Adjust thresholds and contexts based on performance
- Delete Plugins: Remove plugins that are no longer needed
Best Practices for Prompt Plugins
To get the most out of prompt plugins:
- Clear Context Descriptions: Write specific, unambiguous activation contexts to prevent false triggers
- Appropriate Thresholds: Start with 0.7 and adjust based on testing - lower for broader activation, higher for precision
- Complete Instructions: Each plugin should contain comprehensive instructions as it fully replaces the base prompt
- Test Thoroughly: Use the testing tool to verify plugins activate correctly before deployment
- Monitor Activations: Review activation logs to ensure plugins trigger appropriately
- Avoid Overlaps: Design plugins with distinct contexts to prevent confusion about which should activate
Note: Prompt plugins are evaluated using OpenAI's GPT-5.2 for consistent, high-quality context analysis, regardless of which model you use for chat responses. This ensures reliable plugin activation across all supported LLM providers (OpenAI, Google Gemini 3.0, Mistral 3.0, etc.).
5. Knowledge Base Extension
HybridAI allows you to extend your chatbot's knowledge base through document uploads and web crawling, so your bot is better informed about topics relevant to your business or use case.
5.1 Document Upload
In the Admin Panel > AI Settings > Chat & Knowledge section, you can upload various document types:
- PDF Documents: Technical documentation, brochures, manuals, books
- Word Documents (.docx): Reports, articles, procedures
- CSV Files: Data tables, product catalogs, statistical information
- Text Files (.txt): Simple text information, code snippets, notes
Uploaded documents are processed and converted into a format that allows the AI to reference and use this knowledge when answering user questions. The system automatically extracts content while preserving the structure and relationships between different parts of the document.
Document Metadata Headers
To enhance document organization and searchability, you can add metadata headers at the beginning of your documents (PDFs, text files, or markdown files). The system automatically extracts this metadata during upload and stores it with each document chunk, making your content more discoverable and well-organized.
Supported Metadata Formats:
1. YAML Front Matter (Markdown-style):
---
title: Product Documentation Q4 2024
date: 2024-10-15
author: John Smith
category: Technical Documentation
---
Your document content starts here...
2. Markdown Headers:
### METADATA ###
title: User Manual v2.0
date: 2024-10-15
version: 2.0
department: Engineering
###
Your document content starts here...
3. Tagged Format:
[METADATA]
title: Annual Report 2024
date: 2024-10-15
topics: Finance, Strategy, Growth
guest: CFO Michael Johnson
[/METADATA]
Your document content starts here...
4. Simple Key-Value Format:
Title: Training Materials
Date: 2024-10-15
Episode: 42
Topics: AI, Machine Learning, Best Practices

Your document content starts here...
Recognized Metadata Fields:
- title: Document title or name
- date: Publication or creation date
- episode/episode_number: Episode number (for series or sequences)
- url/link: Associated website or reference URL
- guest/guests: Featured people or speakers
- topics: Main themes or subjects covered
- author: Document author or creator
- version: Document version number
- category: Document category or type
- Any custom field: Additional fields are preserved with lowercase keys
Best Practice: Place metadata at the very beginning of your document (first page for PDFs). The system automatically detects and extracts this information, making your documents more searchable and better organized within the knowledge base. This is particularly useful for series of documents, training materials, or content with multiple episodes or versions.
5.2 Web Crawling
HybridAI offers a powerful web crawling feature that allows your chatbot to learn from website content:
- Navigate to Admin Panel > AI Settings > Chat & Knowledge
- Find the Web Crawling section
- Enter the base URL from which the bot should learn (e.g., "https://yourdomain.com/knowledge/")
- Set the maximum number of pages to crawl (recommended: start with 10-20 pages)
- Click "Start Crawling" to begin the process
The system automatically explores the website, follows links from the specified URL, and extracts content that is incorporated into your chatbot's knowledge base. The crawling progress is displayed in real-time, showing which pages are currently being processed.
Note: For best results, direct the crawler to specific sections of your website that contain the most relevant information. Avoid crawling very large websites at once by starting with the most important sections.
5.3 Knowledge Management
After uploading documents or crawling websites, you can manage your knowledge base:
- View all uploaded files in the knowledge repository
- Delete outdated or irrelevant documents
- Update files by uploading newer versions (the system automatically replaces them)
The AI will automatically incorporate this knowledge into conversations when relevant questions are asked.
6. Image Integration
HybridAI supports image integration, which allows your chatbot to display relevant images during conversations to improve user engagement and information delivery.
6.1 Uploading Images
To add images to your chatbot's library:
- Go to Admin Panel > AI Settings > Chat & Knowledge
- Scroll to the Upload Image section
- Select an image file (supported formats: PNG, JPG, JPEG, GIF, SVG, WEBP)
- Add a descriptive caption that explains what the image shows
- Click "Upload Image" to add it to your bot's library
6.2 How Image Integration Works
Images are automatically integrated into your chatbot's instruction system. The bot understands:
- What each image represents (based on your description)
- When it's appropriate to display certain images
- How images can be referenced in conversation contexts
When a user asks a question or discusses a topic related to one of your uploaded images, the chatbot can choose to display the image alongside its text response to improve understanding.
6.3 Managing Images
You can manage your image library through the same interface:
- View all uploaded images with their descriptions
- Delete images that are no longer needed
- Update descriptions to improve the bot's understanding of when each image should be used
7. Website Commands
Website commands allow the chatbot to dynamically interact with elements on the web page. These can highlight sections, fill forms, navigate, or change page content.
7.1 How Website Commands Work
When a chatbot recognizes a relevant action, it triggers a JavaScript event that modifies the web page.
To activate this, you need to add it to the bot's instructions, e.g., When asked about "Scope 1", include the command [CMD:highlight=Scope1] in your response.
Website commands are an integral part of the website bot (located at the bottom right of the website), you just need to activate them by making them part of the agent's instructions (see example below).
Website commands target HTML elements via their ID property. Please use properties in lowercase. Avoid spaces in the ID property and use underscores instead.
If a command cannot be executed, you can check the browser console to see which element the system is trying to address.
7.2 Available Commands
| Command | Description |
|---|---|
| highlightElement(selector) | Highlights a web page element. |
| fillInput(selector, value) | Fills an input field with a predefined value. |
| navigateTo(url) | Redirects the user to another web page. |
8. Human Takeover
HybridAI includes a human takeover feature that allows human agents to seamlessly intervene in a conversation when needed.
8.1 Triggering a Takeover
- The chatbot detects high emotional urgency or frustration
- The chatbot detects a business opportunity or service issue
- A user explicitly requests human support.
- An administrator manually takes control via the admin panel.
- The bot operator also receives an immediate notification "Chat response required" with a link to the response interface for quick reaction
8.2 Admin Panel for Takeover
In the Admin Panel > Chat Console, administrators can:
- View live conversations, including the results of the sensing model.
- Intervene and send manual responses.
- For notifications to operators, the takeover link is embedded in the notification
8.3 Sensing & Trigger
In Sensing & Trigger, you can adjust the threshold at which a sensing dimension begins to activate the notification.
It's also possible to configure two custom dimensions that describe relevant events for your use case.
8.4 Alert Controls (Admin Chat Console)
In the Admin Chat Console, you can fine-tune how alerts surface to operators:
- Enable browser alerts for high sentiment: Shows in‑page toasts and can show system notifications when a metric crosses its threshold.
- Play sound: Plays a short chime alongside the alert (requires a user gesture once per session due to browser policy).
- Notify even when tab is visible: If enabled, system notifications will fire even while the admin tab is in the foreground.
- Send email alerts: Sends alert emails to the bot owner when thresholds are met. This setting is bot‑wide (stored in sensing settings) and defaults OFF.
Thresholds are configured in Sensing & Trigger. Alerts are generated when any metric meets or exceeds its configured threshold.
9. AI Functions & API Integration
9.1 Function Calls
HybridAI supports function calls to extend chatbot capabilities. You can activate predefined functions such as:
- Retrieve ISS position (real-time satellite tracking)
- Energy price queries
- Perplexity search for current information
You can try the currently integrated functions found on the function call page. Contact us if you want to implement your own functions. For security reasons, this will be available later in self-service mode.
9.2 Bot Memory API (IoT & External Data Integration)
HybridAI offers a Bot Memory API that allows you to transfer external data (such as IoT measurements, user preferences, or context information) directly into your bot's memory. This enables your bot to have persistent knowledge that improves its responses.
Key Features:
- Store IoT sensor data, measurements, and telemetry
- External storage of user preferences and settings
- Dynamic updating of bot knowledge via API
- Organization of data with custom keys and types
- Automatic integration into bot conversations
API Endpoints:
Store/update memory:
POST /v1/bot/memory
Authorization: Bearer YOUR_API_KEY
Content-Type: application/json

{
    "bot_id": "YOUR_BOT_ID",
    "memory_key": "temperature_sensor_1",
    "memory_content": "Current temperature: 22.5°C, humidity: 65%",
    "memory_type": "sensor_data"  // optional, default: "general"
}
Retrieve memory:
GET /v1/bot/memory?bot_id=YOUR_BOT_ID&memory_key=temperature_sensor_1
Authorization: Bearer YOUR_API_KEY
Delete memory:
DELETE /v1/bot/memory?bot_id=YOUR_BOT_ID&memory_key=temperature_sensor_1
Authorization: Bearer YOUR_API_KEY
Use Cases:
- IoT Integration: Send sensor values, device states, or alarms to your bot
- Personal Assistant: Store user goals like "I want to lose weight by the end of the year"
- Business Context: Update inventory, prices, or availability
- Dynamic Knowledge: Keep the bot informed about changing conditions or states
Example: IoT Temperature Monitoring
import requests

# Your IoT device sends temperature data
api_url = "https://hybridai.one/v1/bot/memory"
headers = {"Authorization": "Bearer YOUR_API_KEY"}

# Update temperature measurement
data = {
    "bot_id": "YOUR_BOT_ID",
    "memory_key": "office_temperature",
    "memory_content": "Office temperature at 2:30 PM: 23.5°C (comfortable range)",
    "memory_type": "iot_sensor"
}

response = requests.post(api_url, json=data, headers=headers)

# When users now ask "What's the office temperature?",
# the bot has this information in its context
9.3 OpenAI-Compatible API
HybridAI now offers an OpenAI-compatible API that allows you to integrate your custom chatbots with your applications. Key features include:
- Standard OpenAI-compatible endpoint format
- Support for Completions and Chat Completions
- API key management through the admin panel
- Multi-bot selection for different use cases
Using the API
To use the API, first generate an API key in the Admin Panel > API Keys section. Then use the API with standard libraries:
import openai

# Configure with your API key and HybridAI base URL
openai.api_key = "YOUR_API_KEY"
openai.base_url = "https://hybridai.one/"

# Make a chat completion request
response = openai.chat.completions.create(
    model="gpt-3.5-turbo",  # You can use available models
    messages=[
        {"role": "user", "content": "Hello, world!"}
    ],
    chatbot_id="YOUR_BOT_ID"  # Specify which of your bots you want to use
)

print(response.choices[0].message.content)
9.4 N8N Integration
HybridAI offers native integration with N8N, a powerful workflow automation platform. This integration allows you to incorporate complex automations and workflows directly into your chatbots through natural conversation.
What is N8N?
N8N is an open-source workflow automation platform that enables you to connect various services and applications. With N8N, you can:
- Create automated workflows between different platforms
- Synchronize and transform data between systems
- Automate complex business processes
- Seamlessly integrate webhooks and APIs
- Set up real-time notifications and alerts
- Automate database operations and file processing
How N8N Integration Works
The HybridAI N8N integration transforms your N8N webhooks into AI function calls that can be invoked naturally through conversation. Here's how it works:
- Webhook Discovery: The system automatically scans your N8N workflows for webhook triggers
- Function Creation: Convert discovered webhooks into AI function calls with custom parameters
- Natural Invocation: Users simply ask the chatbot to perform actions using natural language
- Automatic Execution: The AI identifies the intent and calls the appropriate N8N workflow with the correct parameters
Setting Up N8N Integration
To set up N8N integration for your chatbot:
- Go to Admin Panel → AI Settings → N8N Integration
- Enter your N8N API key (get it from n8n.hybridai.one)
- Set the N8N base URL (default: https://n8n.hybridai.one)
- Click "Discover Webhooks" to scan your active workflows
- For each webhook, click "Create Function Call" to convert it into an AI function
- Define function parameters using JSON schema format
- Test the integration through natural conversation
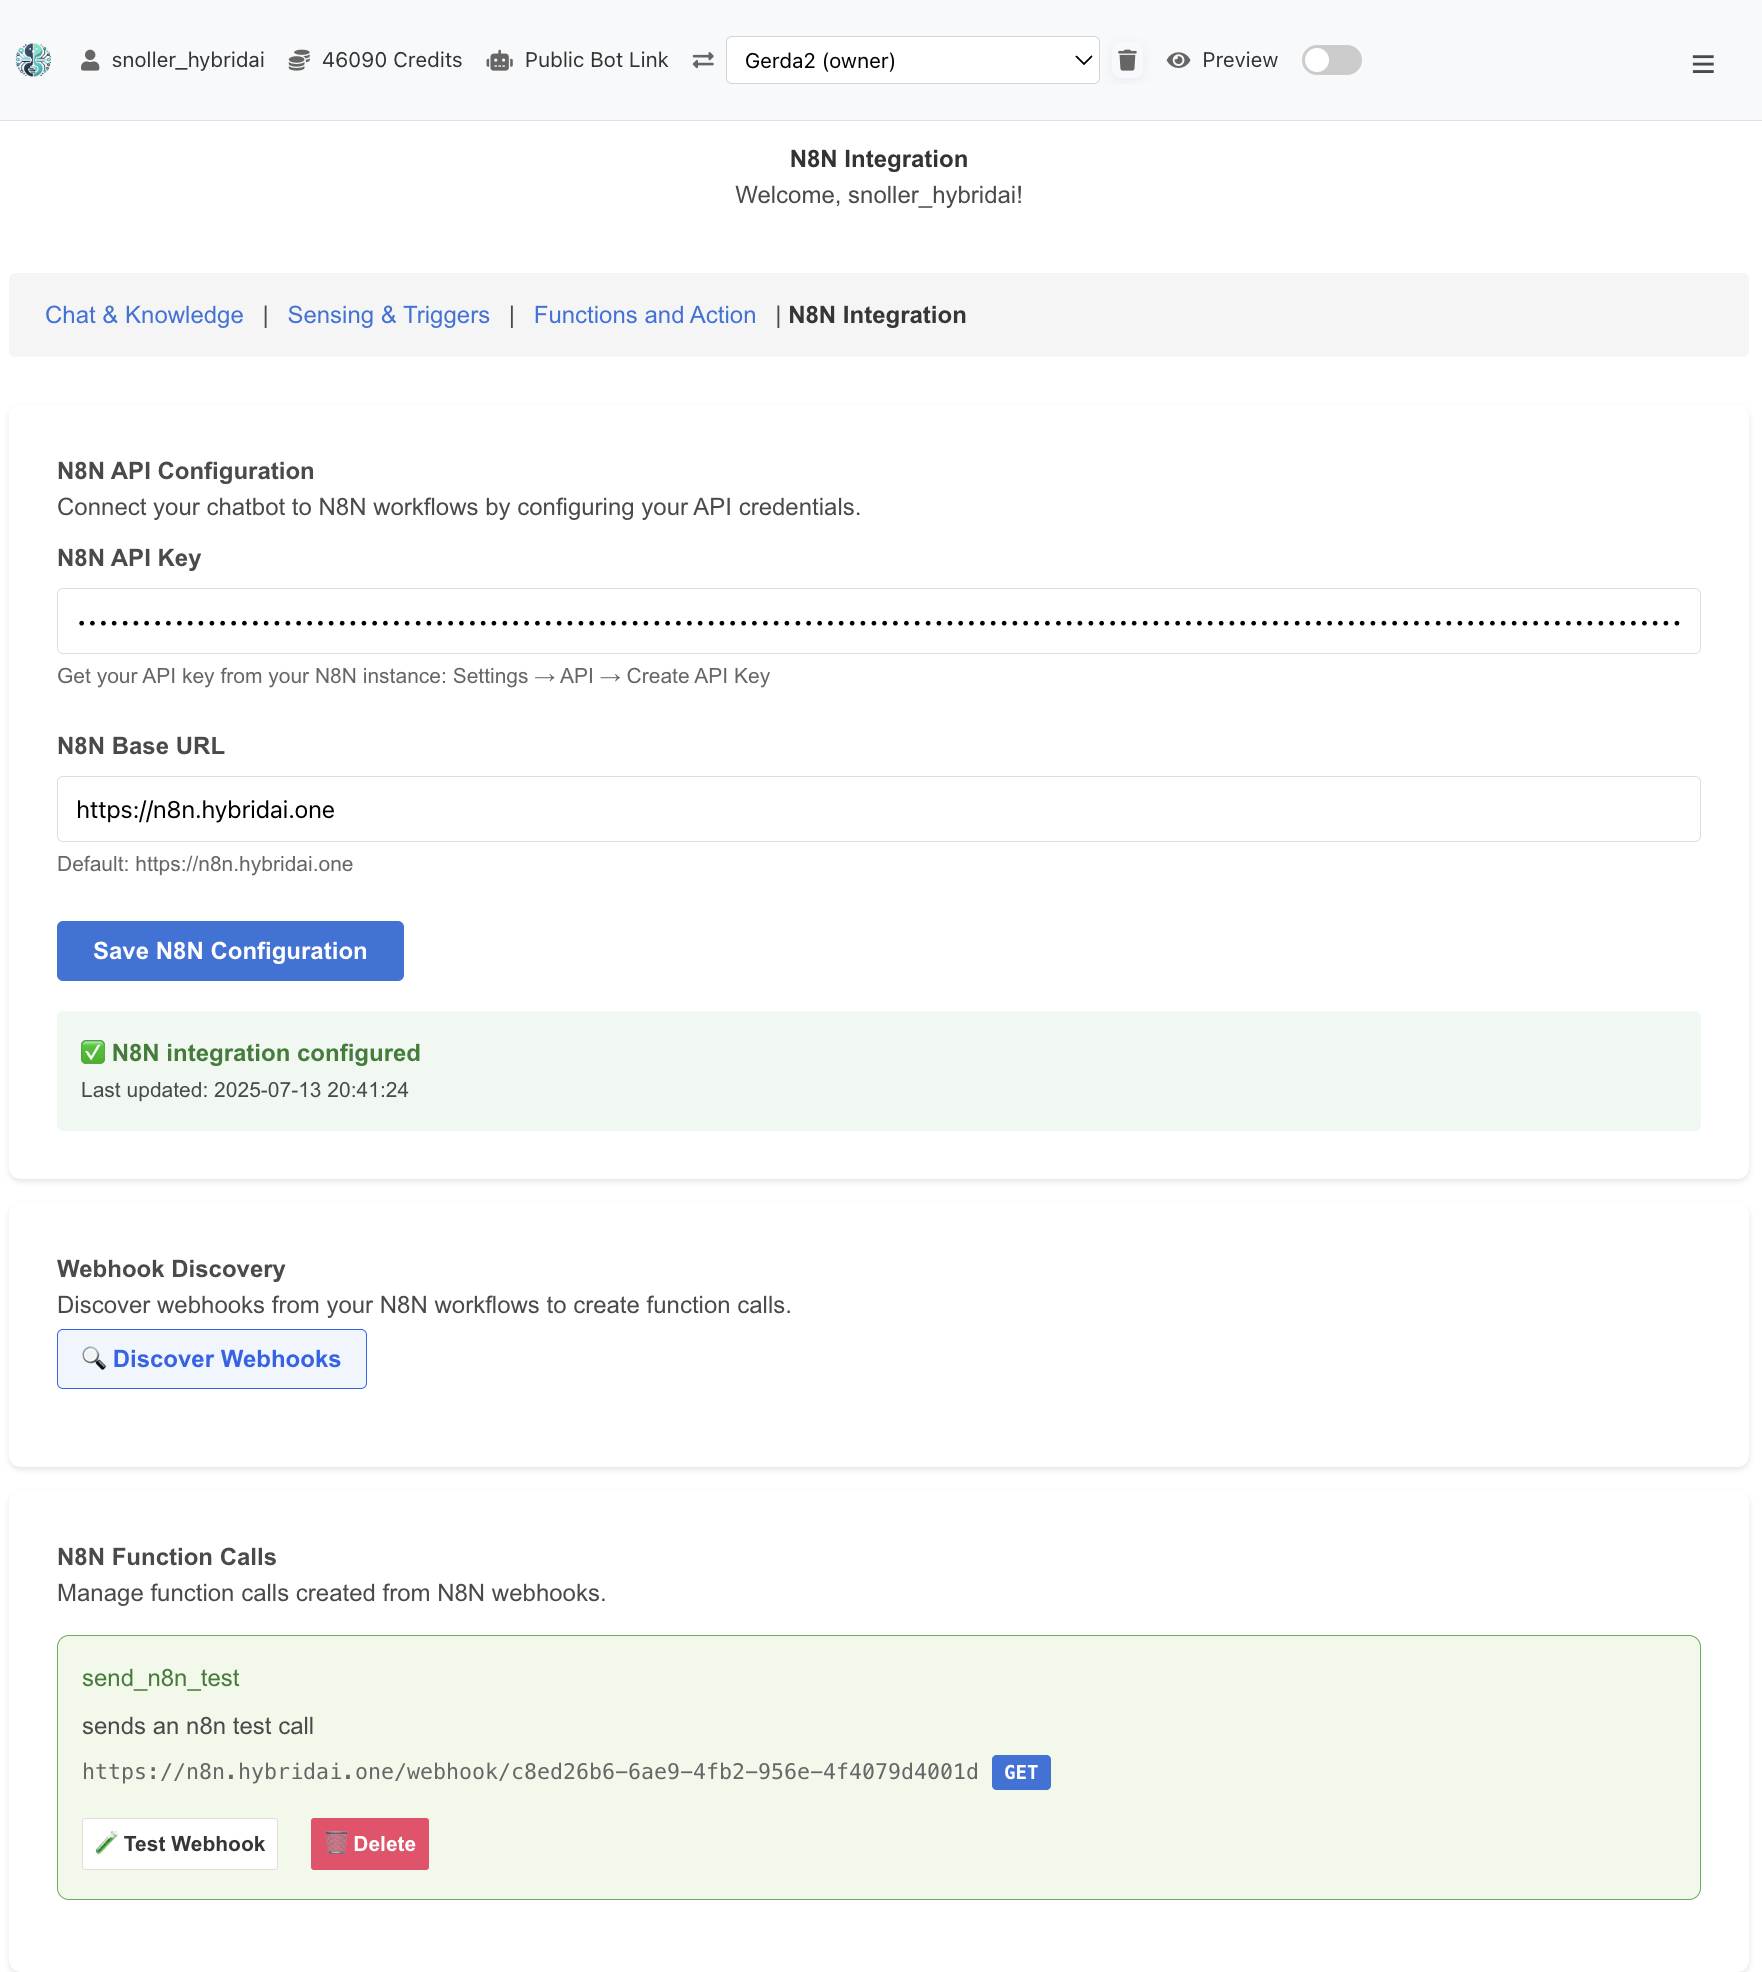
The N8N Integration interface showing API configuration, webhook discovery, and function call management.
Creating Function Calls from Webhooks
When creating function calls from N8N webhooks, you need to define:
- Function Name: A descriptive name like "send_notification" or "create_task"
- Description: Clear explanation of what the function does
- Parameters: JSON schema defining the input parameters the AI should collect
Example Parameter Schema
{
  "type": "object",
  "properties": {
    "message": {
      "type": "string",
      "description": "The notification message to send"
    },
    "recipient": {
      "type": "string",
      "description": "Email address or username to notify"
    },
    "priority": {
      "type": "string",
      "enum": ["low", "normal", "high"],
      "description": "Priority level of the notification"
    }
  },
  "required": ["message", "recipient"]
}
Natural Language Usage
Once N8N functions are set up, users can invoke them naturally:
- User: "Please send a high priority notification to john@example.com saying the server is back online"
- AI: Automatically calls the `send_notification` function with the extracted parameters
- Result: N8N workflow executes and the user receives confirmation
Use Cases
Popular use cases for N8N integration include:
- Customer Support: Automatically create support tickets and assign them
- Task Management: Create and assign tasks to team members
- Notifications: Send alerts via email, Slack, SMS, or other platforms
- Data Processing: Trigger data analysis or report generation
- E-commerce: Process orders, check inventory, update product information
- CRM Integration: Create leads, update contact information, log interactions
Example: Customer Support Automation
A practical example of N8N integration for customer support:
- User: "I'm having trouble with my account login"
- AI: Automatically calls `create_support_ticket` function
- N8N Workflow: Creates ticket in support system, assigns to appropriate team
- AI Response: "I've created support ticket #12345 for your login issue. Our team will contact you within 24 hours."
- Additional Actions: N8N can send confirmation email, notify support team, etc.
Native N8N Instance
We provide a native N8N instance at n8n.hybridai.one, specifically configured for integration with HybridAI chatbots. This instance offers:
- Optimized performance for chatbot integrations
- Pre-configured security settings
- Direct API access for webhook discovery
- Dedicated support for HybridAI workflows
Getting Started: Access your N8N instance at n8n.hybridai.one using your HybridAI credentials. The N8N integration feature is available in the Admin Panel under AI Settings → N8N Integration.
10. Analytics & Logs
HybridAI provides real-time analytics and logs for chatbot interactions. Simply visit the "Analytics" page to access:
- User activity metrics and browser information
- Conversation analysis and interaction data
- Detailed usage logs for troubleshooting
- AI-generated recommendations for platform optimization
13. Multi-Bot Management
HybridAI allows you to create and manage multiple chatbots under one account, each with its own configuration:
- Use the bot selection menu to switch between bots
- Create new bots with the "Create New Bot" option
- Configure each bot independently with different settings
- Share specific bots with colleagues or customers
14. Business Intent Extraction
HybridAI includes an advanced Business Intent Extraction feature that automatically identifies and extracts business-relevant information from customer conversations using AI analysis.
14.1 Overview
The Business Intent Extraction system analyzes user messages in real-time to identify important business information such as:
- Competitor names and product mentions
- Business names and company references
- Product interest and service requests
- Location mentions and regional data
- Custom business-specific entities you define
14.2 Configuration
To configure business intent extraction:
- Navigate to Admin Panel → AI Sensing & Triggers
- Scroll down to the Business Intent Extraction section
- Click Add Intent Type to create new extraction rules
- Define your custom entity types with descriptive names
- Provide clear descriptions to guide the AI extraction
- Enable/disable specific entity types as needed
- Click Save Intent Configuration
Entity Configuration Examples
- Entity Type: "competitor_names" - Description: "Names of competing companies or products mentioned by users"
- Entity Type: "product_interest" - Description: "Products or services the user shows interest in"
- Entity Type: "business_names" - Description: "Company names or business entities mentioned in conversations"
- Entity Type: "pricing_mentions" - Description: "Any pricing, budget, or cost-related information"
14.3 Viewing Extracted Data
To view and analyze extracted business intents:
- Navigate to Admin Panel → Analytics
- Access the Business Intents Analytics page at
/admin_analytics_intents - Use the filtering options to refine your view:
- Date Range: Filter by specific time periods
- Entity Type: Focus on specific types of extracted data
- Export data to CSV for further analysis
14.4 Data Analysis & Export
The Business Intent Analytics dashboard provides:
- Real-time Data: View extracted intents as they are captured
- Advanced Filtering: Filter by date, entity type, or search terms
- CSV Export: Download filtered data for external analysis
- Entity Statistics: Overview of extraction frequency and patterns
- Message Traceability: Link back to original conversations
14.5 Integration with Emotional KPIs
Business intent extraction works seamlessly with existing emotional KPI analysis:
- Both analyses use a single AI call for efficiency
- Emotional urgency and business intents are captured simultaneously
- Combined data provides comprehensive conversation insights
- Unified analytics for both emotional and business intelligence
14.6 Use Cases
Popular applications for business intent extraction include:
- Competitive Intelligence: Track competitor mentions and market analysis
- Lead Qualification: Identify high-value prospects and business opportunities
- Product Development: Understand customer needs and feature requests
- Market Research: Analyze customer preferences and trends
- Sales Analytics: Track pricing discussions and purchase intent
- Customer Insights: Build comprehensive customer profiles
Note: Business intent extraction requires active configuration to function. By default, no entities are extracted until you define custom entity types in the AI Sensing settings.
15. Prompt Tuning Clinic
The Prompt Tuning Clinic is a powerful tool for systematically improving your chatbot's responses through training data collection and AI-driven optimization. This feature enables both manual fine-tuning and automated prompt enhancement using advanced machine learning techniques.
15.1 Overview & Why It Matters
Every chatbot's performance depends heavily on the quality of its system prompt (instructions). The Prompt Tuning Clinic helps you:
- Collect Training Data: Systematically gather examples of good and bad responses
- Optimize Prompts: Use AI to automatically improve your chatbot's instructions based on feedback
- Fine-tune Models: Export data for training custom AI models
- Track Performance: Monitor improvements through A/B testing and metrics
By collecting feedback on actual conversations, you create a dataset that captures real user needs and preferences, leading to more accurate and helpful chatbot responses.
15.2 Training Data Collection Workflow
The clinic provides three methods for building your training dataset:
1. Chat History Feedback
- Review actual conversations from your chatbot
- Select a training context (e.g., "customer_support", "sales", "technical")
- Optionally define a training goal (e.g., "Be more empathetic", "Provide shorter answers")
- Click 👍 for good responses or 👎 for poor ones
- The conversation becomes training data with your feedback
2. Manual Example Creation
- Write ideal user questions and bot responses
- Create examples that demonstrate desired behavior
- Examples appear as candidates requiring feedback
- Apply 👍 or 👎 to add them to your training data
3. Synthetic Data Generation
- AI generates diverse examples based on your context and goals
- Specify the number of examples to create (default: 10)
- Review generated candidates
- Apply feedback to accept or reject each example
Important: All examples (manual, synthetic, or from chat history) start as neutral candidates. Only after you provide explicit feedback (👍 or 👎) do they become part of your training dataset. This ensures quality control over all training data.
15.3 Visual Feedback System
The clinic uses color coding to show data status at a glance:
- Gray Border (Neutral): Candidates awaiting feedback - not yet in training data
- Green Border: Positive feedback - examples of good responses
- Red Border: Negative feedback - examples to avoid
- Type Badges:
- ✏️ Manual - User-created examples
- 🤖 Synthetic - AI-generated examples
- 💬 Chat History - From actual conversations
15.4 Training Contexts & Goals
Training Contexts (Required)
Contexts organize your training data by use case or conversation type:
- Create custom contexts like "technical_support", "sales_inquiries", "product_info"
- Each context can have different optimization goals
- Helps the AI understand different conversation scenarios
- Settings persist across sessions for convenience
Training Goals (Optional but Recommended)
Goals define what you want to improve:
- Examples: "Be more concise", "Show more empathy", "Include technical details"
- If not specified, the system uses: "General improvement - make responses more like the positive examples"
- Specific goals lead to more targeted optimizations
- Can vary by context for nuanced improvements
15.5 Automated Prompt Optimization
Once you've collected training data, use the DSPy-powered optimization engine:
Optimization Modes
- Refine Mode: Improves your existing prompt based on feedback patterns
- Generate Mode: Creates a new prompt from scratch using training data
How It Works
- Analyzes positive and negative examples in your training data
- Identifies patterns in what makes responses good or bad
- Generates improved instructions that encourage positive patterns
- Provides metrics showing confidence and improvement scores
- Allows immediate deployment or further testing
15.6 Data Export & Model Fine-tuning
Export your training data for advanced use cases:
Export Formats
- CSV: For analysis in spreadsheets or data science tools
- OpenAI JSONL: Ready for fine-tuning GPT models
- JSON: For custom processing or integration
Fine-tuning Benefits
With sufficient training data (typically 100+ examples), you can:
- Create custom AI models that embody your specific requirements
- Achieve consistent responses without lengthy prompts
- Reduce API costs with smaller, specialized models
- Maintain full control over model behavior
15.7 Data Review & Management
The "View Data" feature provides comprehensive data management:
Filtering Options
- Filter by feedback type (positive/negative)
- Filter by source (manual/synthetic/chat history)
- View data for specific contexts and goals
- Search within training examples
Bulk Operations
- Export filtered subsets of data
- Delete data by context or feedback type
- Remove individual training examples
- Track data statistics and distribution
15.8 Best Practices
Data Collection
- Start with 20-30 examples per context for meaningful optimization
- Balance positive and negative feedback (aim for 70/30 ratio)
- Focus on real user interactions rather than synthetic data
- Review and clean data regularly to maintain quality
Optimization Strategy
- Begin with specific, achievable goals
- Test optimized prompts with a subset of users first
- Use A/B testing to compare prompt versions
- Iterate based on continued feedback collection
Context Management
- Keep contexts focused and specific
- Don't mix unrelated conversation types
- Document what each context represents
- Regularly review context relevance
Pro Tip: The Prompt Tuning Clinic works best as an iterative process. Start small, optimize, test, collect more feedback, and refine continuously. This creates a virtuous cycle of improvement based on real user needs.
16. Contact & Support
For support, contact service@hybridai.one or visit the HybridAI Website.